 |
| Level 1 |
First off was fixing a couple of errors noted in yesterday's blog: sorting out overly straight paths, empty boring halls, missing rooms and various other minor errors/omissions I later spotter. It is very helpful to have regular walk-throughs of the level in development, so that errors like this can be sorted early on when everything is relatively simple rather than be stuck with them or have to work out fixes around clutter, enemies and the like already in place.
 |
| Level 2 |
Examples: A chicane was added to Level 1's East Corridor. The staircase heading off the West Corridor had its middle set of stairs switched out for an alcove, which added just a little variety and blocked the previously clear view right from top to bottom of the stairs. It also meant that running right down that path didn't result in the avatar apparently skipping over the stairs and floating his/her way down. Finally, it allows for a point of interest - ammo, a trap, aid pickups etc - to be placed in the alcove, slowing the player's descent.
 |
| Level 3 |
Several alcoves were added to corridors on Level 2 (perhaps too many, but they work) and the ridiculously long West Corridor leading towards the door to Level 3 has been violently kinked over near its North end. As for Level 3 itself, that long Underground tunnel ramping downwards had to go. Now the two levels would actually intersect each other if they were constructed in reality but they aren't going to bore a player to death.
A weirder problem occurred in the central hall of Level 3. When standing at one end of the room or beyond and looking at the far side, surfaces stopped being affected by the lighting. Specifically the walls were unlit and the door was totally lit. This I guess is a result of the engine's interior Level Of Detail programming. Quickly fixed by shortening the hall drastically, to a more entertaining size anyway.
 |
| LOD fail (Temp lighting) |
More interestingly I got started on proper lighting and clutter for Level 1. To be honest the lighting arrangement was borrowed from Fort Bannister's file, with a little variation in places. But it works. Off in one corner of the cell, out of view of the player, I have a patch of light pieces pre-arranged for quick and easy placement in the level, which speeds things up.
 |
| Lighting Test |
Clutter is a pleasure to add, though time consuming. With a hint from the Bethesda video tutorial again, I looked up the OPAL (Object Pallet) pack on Fallout 3 Nexus. Object Palettes are collections of commonly used items compatible with an easy-place tool which includes custom random alignment. It makes adding in things like believably messy and complimentary general clutter, posters, blood stains, ammo and furniture nice and simple. It is, however, still fairly time consuming at the moment. I am sure it will get quicker with a little experience.
 |
| Terminal, Safe and Key Test |
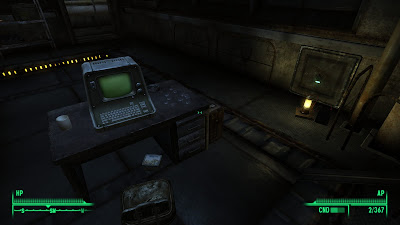
To break up the day - and because my mind wanders off investigating tangents - I ended up teaching myself how to create keys, safes and terminals AND get them all working together. So, in the screenshot above, you see a locked safe with random cheap contents. The terminal, once hacked, can be used to unlocked the safe. Inside the safe is a key which is used to unlocked the door to Level 2. I know, not great gameplay - what happens if you break the terminal or break the safe lock? - but it is just a test of concept at this point.
Right, I think that's everything. I think you're also probably falling asleep here just like I am. Tomorrow... might just be a day of rest, except I don't have anything better to do so how about I finish off Level 1's clutter?
Aloha.
Aloha.

No comments:
Post a Comment