Showing posts with label fallout 3. Show all posts

Friday, 20 August 2010

Project 1 Day 6 - Number Crunching

Rooms and portals w/o statics
Short post today, I feel. Largely because I haven't done so much work today, and none yesterday, but also feeling rather unnecessarily wrecked and spending more time on other projects right this minute.

Anyway, what I have done is optimised Level 1 as best I can. This involves applying room makers to each room and corridor and connecting these blue cubes with portal markers, which are the grey rectangles in the graphic to the left. These markers tell the engine what to render at any given time, so only what is near the player is rendered, thus increasing the frame rate.

Rooms and portals w/ statics
Creating the markers is rather fiddly. Correctly aligning and sizing on the z-axis is a right pain, especially as I made each one individually, not realising they can be duplicated like other elements. Like I said in the last post, because I realise these things now, it will be faster and smoother the next time around.

Oh and there were a few little fixes including getting a working world map marker.

Right, tomorrow is a start on Level 2. Unless maybe it's time to start on a new project... no, definitely got to get this mod finished.

Wednesday, 18 August 2010

Project 1 Day 5 - Give My Creation Life!

No blog post yesterday? No, but I do need to take some manner of break sometime. Still, I managed to get started on one of today's tasks: developing the NavMesh for Level 1. Actually everything I've done lately is for Level 1 alone - I wanted to get something fully playable quick. Plus learning the full level development process on a limited area means building levels 2 and 3 will be so much quicker. Well, that's the theory anyway.

So, NavMesh! What is it? A floor-hugging sheet of red polygons that tells NPCs where they can go. It follows the walls and skirts around the larger clutter like tables and barrels. Fairly simple process but fiddly and time consuming, so it was good spending some time yesterday starting it instead of spending a full day on it. Then cover elements must be identified, which is far simpler: just click two icons and hey presto, done.

Next was choosing sensible NPCs (I've gone with a few various Talon fighters). They will mill around, attack and chase if left like that but further touches are required to add some real life. With a combination of 'idle markers', which say where a person can sit, lean, do push ups or whatever, and navigation paths the NPCs can be made to live out little facsimiles of intelligence. For example, one of the characters in Khalith's Cell spends some time typing at a terminal in the office, wanders down the east corridor, pauses in the central hall, leans against a wall and then returns to the office. If the player is sneaking their way around and not disturbing the Talon Company thugs, they will see such silent plays, where as purely randomly walking figures would break the sense of immersion.

In order to finally get this cell working, players have to be able to get in to it. It took a while trying to work out where to put the access point, including a whistle-stop tour of the Wasteland looking for blank walls or cliffs and the like. Eventually I came across a suitable looking rocky nook to the NE of Vault 108. And then things got weird.
Somebody had already put a cave entrance there. Hidden behind a single large rock was a perfect cave door, neatly aligned with the surrounding cliff face and, now I looked again, with a rough sort of dusty pathway leading almost up to it. Perhaps it was the way in to the nearby Vault at some point during the game's development? Or maybe it was to be part of some other location cut in its entirety? Either way, I counted myself lucky and wondered again that I came to the same conclusions as someone in Bethesda.


So that should be enough for today, I think. What to do tomorrow, hmm... ah, yes! Optimise! And then move on to Level 2! And do all this over again. Oh boy.

Sayonara!

Monday, 16 August 2010

Project 1 Day 4 - Clutterizer 2000

So much for a day of rest, though today was a few hours shorter - 3 till 9pm, not 1 till 9 (ridiculously long blog posts not included). Today's time was mostly devoted to completing Level 1's clutter pass. I started with a list of the rooms, listed by letters which reference their matching rooms in the original map layout, and each had a brief description with maybe a note of particular features I wanted to include. For example, the top three looks something like this:
Level 1 - Lit

(No 'A' because A is the exterior on my map)
B - Complex Approach - motorbike?
C - Hall & General Stores
D - Cave Approach - traps!

Then I went from room to room using a mix of OPALs and the Object Window to add in first big clutter (desks, tables, chairs, lockers) then small clutter (pencils, paper, bottle caps, weapons and ammo).

So what problems did I come across this time? Remembering when to use containers instead of statics. Static versions of cupboards, desks, chairs and wardrobes exist in the game world but cannot be interacted with in any meaningful fashion. To be take loot from these pieces of furniture, you have to use versions of them from the 'containers' list. Easy enough so long as you keep that in mind, especially as there are pre-setup versions of most containers appropriate to different locations: if you have a locker in an office, it's likely to have different contents to a locker in a military bunker so in the former you would place a Locker01Office (which holds some caps and maybe some pre-war money and a finance clipboard) while in the latter you would use Locker01Military (which might hold some ammo and a combat knife instead).
Level 1 - Unlit

It also became apparent that so many similar, 10x10 rooms with a door on the SW side adjoining the West Corridor was going to make for confusing and repetitive level design. The corridor itself was largely a mass of doors with no plain space. Something had to change, so the middle room on the North side was removed. This also allowed for a patch of dimmer light in the corridor, giving the other doors - especially the one leading to Level 2 - more importance.

It seems I like to spend a little time on appearance and a little time on mechanics. The mechanics learned today were related to traps. Another quick look at a video tutorial and I was away. Including basic traps in Fallout 3 is a simple matter of copy-and-paste from a cell called WarehouseTraps, where everything is laid out for easy viewing. Clearly someone or some people at Bethesda think a little like me because that's exactly how I'd set it up. (Easier living through laziness, yay!)

Bear-traps are just copy-pasted in and away you go. Same for grenade-bouquets. Trip-wire traps are only slightly more complicated: place the wire, place the swinging skill/engine-block/girder where it will hit the player and they're going to be left with a nasty concussion. Shotgun traps are fiddly, though, as the exact positioning of the pressure-plate and the shotgun itself must be refined through a process of testing so the player is hit if they follow the predicted path.

Containers and traps

Right, I think that's everything. Tomorrow... yeah, tomorrow I think I'll have to add in enemies and navigation points for them. Ciao!

Sunday, 15 August 2010

Project 1 Day 3 - Scattering the Clutter

What a way to spend a Sunday, hey? Stuck behind a laptop, surrounded by a nest of pillows and bean bags with House Series 5 boxset on the TV. And up to my elbows in thick, detritus-filled GECK.


Level 1
First off was fixing a couple of errors noted in yesterday's blog: sorting out overly straight paths, empty boring halls, missing rooms and various other minor errors/omissions I later spotter. It is very helpful to have regular walk-throughs of the level in development, so that errors like this can be sorted early on when everything is relatively simple rather than be stuck with them or have to work out fixes around clutter, enemies and the like already in place.

Level 2
Examples: A chicane was added to Level 1's East Corridor. The staircase heading off the West Corridor had its middle set of stairs switched out for an alcove, which added just a little variety and blocked the previously clear view right from top to bottom of the stairs. It also meant that running right down that path didn't result in the avatar apparently skipping over the stairs and floating his/her way down. Finally, it allows for a point of interest - ammo, a trap, aid pickups etc - to be placed in the alcove, slowing the player's descent.

Level 3
Several alcoves were added to corridors on Level 2 (perhaps too many, but they work) and the ridiculously long West Corridor leading towards the door to Level 3 has been violently kinked over near its North end. As for Level 3 itself, that long Underground tunnel ramping downwards had to go. Now the two levels would actually intersect each other if they were constructed in reality but they aren't going to bore a player to death.

A weirder problem occurred in the central hall of Level 3. When standing at one end of the room or beyond and looking at the far side, surfaces stopped being affected by the lighting. Specifically the walls were unlit and the door was totally lit. This I guess is a result of the engine's interior Level Of Detail programming. Quickly fixed by shortening the hall drastically, to a more entertaining size anyway.

LOD fail (Temp lighting)
More interestingly I got started on proper lighting and clutter for Level 1. To be honest the lighting arrangement was borrowed from Fort Bannister's file, with a little variation in places. But it works. Off in one corner of the cell, out of view of the player, I have a patch of light pieces pre-arranged for quick and easy placement in the level, which speeds things up.

Lighting Test
Clutter is a pleasure to add, though time consuming. With a hint from the Bethesda video tutorial again, I looked up the OPAL (Object Pallet) pack on Fallout 3 Nexus. Object Palettes are collections of commonly used items compatible with an easy-place tool which includes custom random alignment. It makes adding in things like believably messy and complimentary general clutter, posters, blood stains, ammo and furniture nice and simple. It is, however, still fairly time consuming at the moment. I am sure it will get quicker with a little experience.

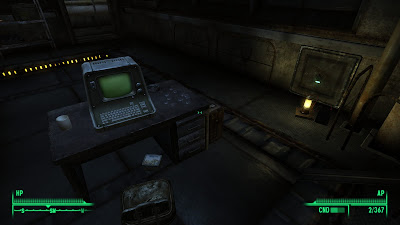
Terminal, Safe and Key Test
To break up the day - and because my mind wanders off investigating tangents - I ended up teaching myself how to create keys, safes and terminals AND get them all working together. So, in the screenshot above, you see a locked safe with random cheap contents. The terminal, once hacked, can be used to unlocked the safe. Inside the safe is a key which is used to unlocked the door to Level 2. I know, not great gameplay - what happens if you break the terminal or break the safe lock? - but it is just a test of concept at this point.

Right, I think that's everything. I think you're also probably falling asleep here just like I am. Tomorrow... might just be a day of rest, except I don't have anything better to do so how about I finish off Level 1's clutter?

Aloha.

Saturday, 14 August 2010

Project 1 Day 2 - Laying Out The Level

Day number two! We're on a roll!

Level 1
Today's work began with a realisation that the existing work was going to be unsuitably large as a single cell (which has the problems of long loading times and sluggish performance). And in order to make it work as two cells I had to first teach myself how to connect one cell to another.

It turns out the process is marvellously easy. All cells are connected by doors, entirely standard doors, which have been set by an option in their Properties window to teleport the player to another door in another cell. So just a quick note of the relevant door's unique ID# from one level, input into the teleport target field for the other level's connecting door and essentially... bingo! Though the arrival point and direction have to be slightly fine tuned.

Level 2

However this wasn't the goal of the day. Recreating the layout of the dungeon known as Khalith's Cell was, so I began with that. A little experimentation and thought showed the Vault (Rusted) tileset was limiting and inappropriate, so I switched to (mostly) the Utility tileset, with a smattering of Underground and Cave.

Toilets were the most diffi... oh, crap, I just noted some missing small rooms on the West side of Level 2. I'll make a note to fix that tomorrow. Anyway, toilets. Using the UtlRm (Utility Room) series didn't seem right. All those thick pipes running vertically in the corners and tubes looping around the ceiling? What toilet has stuff like that? Apparently the ones in Fallout 3's utility tunnels, judging from a little research in Fort Bannister.

Level 3
Transitions from small to big hallways (UtlHallSm and UtlHallBg) were also problematic. Just finding tiles that fit neatly together was a pain, but not nearly as much as with the Vault tileset, one of the reasons I dumped it. Not many different sets fit to many others, but just about everything fits to Utility.


At this early stage there are already things I see that need fixing. Following the original plans to the letter may have been a little reckless. There are far too many long, straight and at least so far featureless corridors and stairways. Even looking forward to their cluttered and combat-prepared state, I can't see them being much fun without serious adjustment. Similarly, there are two large chambers - one on level 2 and one on level 3 - which take a long time to cross and suffer the same problems.

Anyhow... tomorrow, I think I will be adjusting the layout in the mentioned places and adding in ambient testing lighting, the lack of which you can blame for the absence of any actual screenshots.

Adios.

Friday, 13 August 2010

Project 1 Day 1 - Learning the GECK

I said I'd be here today and here I am. Frankly I'm pretty amazed myself. What amazes me even further is that I (gasp, shock, horror) actually did some work.


Once I got the windows arranged nicely and familiarised myself with the major keyboard shortcuts and camera controls, the GECK was quite easy to work with. My one complaint, which may lay in my inexperience with the software is that it is difficult to position items vertically. I would prefer it if new meshes would appear on the same plane as the previously selected item, rather than X many units directly in front of the camera.

So with that done I jumped in with arranging a few rooms along a long corridor (the right hand side of the above image), glancing at Bethedsa's video tutorial when I got a little stuck. I don't like to always follow tutorial through to the letter, rather seeing what I can do along the same theme.

Actually, wait. Backup a little. I actually began with trying to recreate the stretch of cavern that approaches the giant cog doors of a vault. It was perhaps a little difficult to begin with, especially as I couldn't seem to get the meshes to line up right. I suppose I was using mixed sets.


The meshes are the best bit, from a quick-development point of view. The Oblivion/Fallout engine is based around segments of (about) 5 foot cube, each very carefully arranged to fit well with the rest of its set. That measure of 5ft is interesting, echoing the engine's pen-and-paper roleplaying roots. Surely that is how much of the world of Cyrodil was developed: through tabletop gameplay on the grid.

The only other engine I am familiar with as a design student is Unreal 3 and the editor that comes with Unreal Tournament 3. Like Fallout 3, much of that game's level architecture is built from static meshes but comparing the two I now realise how limited UT3's meshes were, designed for very specific uses. The mesh library in GECK feels huge and fairly adaptable. The transition pieces (such as a break in an office wall leading to caves) will be especially useful.


So far I have really just been experimenting, getting a feel for the system. In tomorrow's session I think I might adjust and re-arrange my vault, or even start again, and follow a pre-existing design of mine. This design is actually a Dungeons & Dragons subterranean temple, a favourite of my gaming group, but the layout should transition quite nicely to a vault or similar. Anyhow, we'll see. Same time tomorrow, children!

GECK Wiki
Bethesda GECK Tutorial #1 (YouTube)